On Graphvix - Part 7
Records
DOT provides a node type “record”, which allows data to be displayed in arbitrarily nested rows and columns. It may be easier to visualize than to conceptualize:
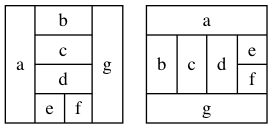
These examples show, on the left, an example of a record with rows as its starting orientation, and on the right, a record beginning with columns.
The DOT notation for records is relatively simple, though it can become cumbersome to read for complex records: elements in a single row or column are separated by the | symbol, and a change in orientation is delimited by { and }. By default, a record will begin in rows. To begin with columns, surround the entire record label between brackets.
This is what the records shown above look like in DOT notation:
[shape="record",label="a | { b | c | d | { e | f } } | g"]

[shape="record",label="{ a | { b | c | d | { e | f } } | g }"]
Before we dive in to how to model these nodes in Graphvix, there is one other aspect of records that we should examine. That is the concept of ports.
Ports
Ports identify individual cells in a record, and allow edges to be drawn directly to them. Again, it may be easier to understand this by seeing it in action:
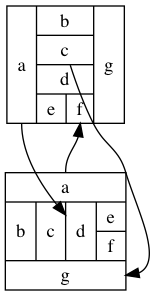
And the DOT code:
digraph G {
  v0 [shape="record",label="<a> a | { b | <c> c | d | { e | <f> f } } | g"]
  v1 [shape="record",label="{ <a> a | { b | c | <d> d | { e | f } } | <g> g }"]

  v0:a -> v1:d
  v0:c -> v1:g
  v1:a -> v0:f
}
As we can see from this example, ports are defined by prepending <port-id> to a cell in a record definition, and used by appending :port-id to the relevant node-id in the edge definition.
With this understanding of records, we can enumerate the tasks we need Graphvix to be able to handle:
- create a
Recordstruct, with an API to easily create rows and columns - attach port names to cells in a
Recordstruct - generate correct
DOToutput for nodes withshape=record - generate edge definitions using record ports
This post is part of a series:
- Part 1 - The over engineering-ing
- Part 2 - A :digraph primer
- Part 3 - IDs
- Part 4 - A first API
- Part 5 - Global settings
- Part 6 - Subgraphs
- Part 7 - Records
- Part 8 - Records API
- Part 9 - Ranking
- Postscript - HTML Records
Records in Graphvix
Let’s begin with a basic struct
defmodule Record do
  defstruct [
    body: nil,
    attributes: []
  ]
end
We will also need structs to hold rows and columns that can be nested. For now, let’s do something simple like this:
defmodule RecordSubset do
  defstruct [
    cells: [],
    is_column: false
  ]
end
Let’s start with a simple Record.new/1 function. This function will take either a string, a list of strings, or a RecordSubset. A record which has only a string as its contents is not a very interesting record, but we want to allow for all possibilities. A Record initialized with a list will create a record beginning with a row of cells, as is the default in DOT notation.
def new(string) when is_bitstring(string) do
  %Record{body: string}
end
def new(list) when is_list(list) do
  %Record{body: %RecordSubset{cells: []}}
end
def new(row_or_column = %RecordSubset{}) do
  %Record{body: row_or_column}
end
Now, for example, in our code we could do things like this:
iex> Record.new("a")
%Record{body: "a", attributes: []}

iex> Record.new(["a", "b", "c"])
%Record{body: %RecordSubset{
  cells: ["a", "b", "c"],
  is_column: false
}}

iex> Record.new(
...>   %RecordSubset{cells: ["a", "b", "c"], is_column: true},
...>   color: "blue"
...> )
%Record{
  body: %RecordSubset{
    cells: ["a", "b", "c"],
    is_column: true
  },
  attributes: [color: "blue"]
}
And we can begin to nest rows and columns:
iex> Record.new([
...>   "a",
...>   %RecordSubset{cells: ["b", "c"], is_column: true},
...>   "d"
...> ])
%Record{
  body: %RecordSubset{
    cells: [
      "a",
      %RecordSubset{
        cells: ["b", "c"],
        is_column: true
      },
      "d"
    ],
    is_column: false
  },
  attributes: []
}
Right now this isn’t too complicated, but it’s easy to see how any additional nesting will make creating new record nodes increasingly unwieldy. We could use a couple helper methods to reduce the overhead
defmodule Record do
  ...
  def row(cells) do
    %RecordSubset{cells: cells, is_column: false}
  end

  def column(cells) do
    %RecordSubset{cells: cells, is_column: true}
  end
end
This lets us abbreviate the above nested record node thusly:
iex> Record.new(["a", Record.column(["b", "c"]), "d"])
Now that rows and columns have been sorted out, we can turn our attention to the final piece of the DOT record puzzle: record cell ports.
Ports in Graphvix
A cell with a port name is simply a pairing of a port label and the cell’s contents, and given that, we can represent it equally simply with a tuple. To maintain the order found in the DOT notation, the tuple will take the form {port-name, cell-contents}. Let’s see this notation in action:
iex> Record.new(["a", Record.column(["b", {"c_port", "c"}]), "d"])
The last pieces of the API left is adding a record as a vertex, and adding an edge drawn to or from a particular port of a record. We can accomplish this by passing a tuple as one of the vertex_id arguments to Graph.add_edge/4, containing the vertex id as well as the name of the port:
g = Graph.new()
{g, v1} = Graph.add_vertex(g, "normal node")
r = Record.new(["a", {"b_port", "b"}, "c"])
{g, v2} = Graph.add_vertex(g, r)
{g, _e} = Graph.add_edge(g, {v2, "b_port"}, v1)
This sketches out the API we need to construct to incorporate records and ports into Graphvix. Since this post has gotten fairly long, I will save discussing the implementation of this API for the next post. So thanks for reading, and stay tuned!